The Guidelines
1. Introduction
These guidelines are intended for researchers who manually annotate non-manual elements in visual communication data.
- Visual communication data are videos used to investigate visual communication between people. Visual communication includes multimodal communication (speaking and gesturing at the same time), silent gesture (gesturing alone, often in a lab setting), or sign language (e.g., Sign Language of the Netherlands).
- Non-manual elements are facial expressions, head and body movements and postures that people make while communicating. Manual elements are hand movements and configurations.
You are currently reading the prototype version of the guidelines, which were first published in September 2024. This prototype version of the guidelines was developed by Marloes Oomen, Cindy van Boven, Lyke Esselink, Tobias de Ronde, and Floris Roelofsen of SignLab at the University of Amsterdam.
Overview
In Section 2 and Section 3, we discuss the two basic principles for annotating non-manual elements according to the present guidelines.
In Section 4, we briefly introduce the annotation software ELAN.
In Section 5, we present the ELAN annotation template that can be used by annotators.
In Section 6, we discuss all annotation labels that are included in the annotation template.
In Section 7, we offer some general background information and recommendations for researchers.
About using ELAN
In the research fields of sign language linguistics and multimodal communication, ELAN is frequently used as annotation software. This is why our annotation template makes use of ELAN.
In principle, it is also possible for researchers to use the annotation guidelines with different annotation software. The basic principles that are discussed in Section 1 and 2, and the annotation labels described in Section 6 still hold.
Section 4 is not relevant in this case, because this chapter exclusively discusses ELAN. Section 5 remains partially applicable, but the tutorial sections about ELAN are not relevant in this case.
Example annotations
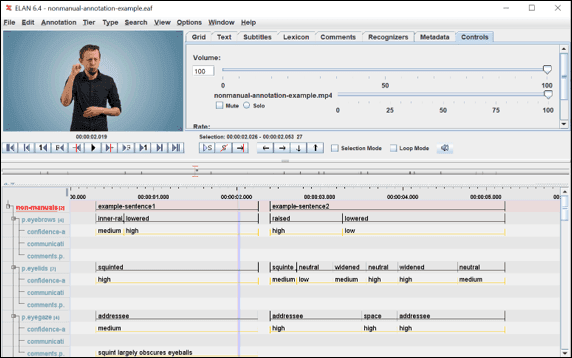
We made example annotations for a video file with two sentences in Sign Language of the Netherlands.
It is practical to keep this example at hand when annotating according to these guidelines for the first time.
The annotation file (.eaf) and the video can be downloaded here (under Files > Example annotations).
Before you start
It is very important that you thoroughly absorb the information in Sections 2 to 5 before you start annotating.
These chapters contain quite a lot of information so studying them requires some time investment, but this is essential for the annotation process.
2. Annotation strategies
There are two general strategies for annotating a certain segment in a video:
- Annotating based on form
- Annotating based on comparison
In principle, you are meant to annotate based on form.
However, often this is easier said than done! When you annotate, you will often come across non-manual configurations or movements which fall in a certain gray area (e.g., the eyebrows are not fully raised but not really neutral either), consequently making them difficult to label. A major challenge is to determine what to do in such cases. We have developed a concrete guideline for this scenario, which we discuss in this section. Read this information carefully!
Annotating based on form
In principle, you annotate based on form. As an example, below you see two video stills from a fragment in which a signer is telling a short story in Sign Language of the Netherlands. We are interested in annotating the eyelids in this example. In our annotation template, we make annotations for this body part on the tier ‘p.eyelids’. This tier includes four possible annotation labels: neutral, squinted, widened, closed (see Section 6 for descriptions).


If you had to annotate these video stills purely based on form, which labels would you opt for?
...
In all likelihood, you will agree with our label choice:
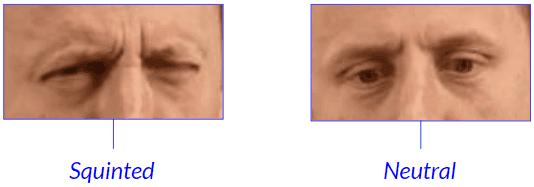
In these cases, we are able to select the annotation labels squinted and neutral with reasonable certainty.
But how would you label the following video still?:

It is very well possible that you are hesitating here between the labels squinted and neutral.* Put differently, if we were to ask ten different people to choose an annotation label for this image, then it is likely that some will choose squinted (because the eyelids are squeezed together a little bit), while others will opt for neutral (because the eyelids are only squeezed together the tiniest bit).
*Perhaps you even considered the label widened, but be cautious: the eyelids are not widened here; it is the eyebrows that give the possible illusion of widened eyes.
Annotating based on comparison
The example given in the previous subsection is difficult to label based on form because it appears to fall in between two annotation values. In such cases, you probably automatically switch to a different strategy: instead of looking purely at form, you start comparing what you see with other cases which you already labeled and which you felt a lot more certain about:

The problem is that annotating based on comparison is a lot more subjective, substantially increasing the likelihood that different annotators make different choices.
If you were to order the three video stills introduced above on a sort of scale from obviously squinted to obviously neutral, it is well possible that you would do it something like this:

But it is equally possible that you see it as something like this:

In the first scenario, you lean more toward the label squinted, and in the second scenario to neutral. It might even happen that you would go for the label squinted on one day, but feel more for the label neutral on another. Not ideal, if the aim is to annotate consistently and reliably!
At the same time, this problem is simply unavoidable when annotating non-manual elements. After all, we are trying to stick categorical labels on things that are not categorical at all, but rather gradual.
This is why below, we shall make explicit how you as an annotator are expected to handle this issue while annotating.
(See Section 7 for a motivation of why we think that manually annotating visual communication data is still worth the trouble, despite these significant challenges).
The solution
First of all, it is very important for annotators to realize and acknowledge that non-manual elements simply are sometimes (or maybe even often) difficult to label.
We therefore ask annotators to indicate for every annotation how certain they are about the label that they chose. This is done on the annotation tier ‘confidence.about.label’ (see Section 5).
You always choose between the labels high, medium and low on this tier.
The basic principle is: the more you can rely purely on form while choosing an annotation label, the higher your confidence in that label; the more you are forced to resort to comparison with other annotation labels, the lower your confidence.
By indicating your confidence in the label that you choose, it becomes possible to take that information on board when analyzing your data later. Researchers may, for instance, decide to only focus on annotations that received a high confidence score, and ignore all the other annotations.
In Section 6, we describe all possible annotation labels for the different tiers. We will only provide examples that are as obvious as possible, i.e., examples that you can label purely based on form. In terms of confidence scores, these are thus examples that we would give the score high.
We purposely do not give examples of cases which we would ourselves give a confidence score of medium or low, because there would be a fair (medium) or even considerable (low) chance that different annotators label these examples differently.
(Note: We plan to evaluate, based on a test data set, if confidence scores and inter-rater agreement are indeed correlated like this in future work.)
Conclusion
- Choose, where possible, annotation labels purely based on form. In Section 6, we specify which label fits with which form.
- If it is not possible to annotate (purely) based on form, then (also) use the comparison strategy.
- Confidence scores are an indication of how certain you are about the labels that you selected. Degree of certainty, in turn, is correlated with the annotation strategy/strategies you used:

3. Poses and movements
- We make an important distinction between two types of non-manual elements: poses and movements.
- An example of a pose is ‘raised eyebrows’. An example of a movement is ‘head shaking’. In the subsections below, we will give general definitions of poses and movements.
- The distinction between poses and movements is also made in the annotation template. The name of a pose tier always starts with p. and the name of a movement tier with m.
- Poses and movements are also annotated according to slightly different principles. We discuss this further in Section 5.
Poses
What are poses?
- Definition: a pose is characterized by a configuration of a part of the face or body that is maintained for a certain period of time.
- Poses can in principle be labeled by separately inspecting each frame in a video; you do not need to inspect multiple consecutive frames (you do for movements).
- On all pose tiers, every annotation unit is annotated continuously. That is to say, the annotation(s) on pose tiers cover the entire annotation unit. The idea behind this is that there is always a pose – which could also be neutral – at any given moment.
- For example: on the 'p.head.tilted.left-right' tier (see Section 6), there are three possible annotation labels: tilted-left, tilted-right, and neutral. There is always one label that applies; after all, it is impossible for the head not to be in a certain position.
A neutral pose is a pose, too!
- You can always select the label neutral on a pose tier.
- The reason for this is that we consider a neutral pose a pose, too.
- For a detailed description of the annotation labels for all tiers, see Section 6.
How long is a pose?
- A pose has no maximal duration; after all, it is possible to maintain a pose for a very long time.
- We do need a minimal duration to consider a certain configuration a pose and not a movement.
- At the moment, we cannot specify a concrete minimal duration (we intend to do this in future work, based on annotated test data sets).
- For the moment, the following guidelines apply:
- In principle, a pose always lasts longer than a (single, so non-repeated) movement.
- Every movement has a specific movement contour. If a series of configurations does not correspond with one of the described movement configurations, then you can consider it (and annotate it) as a series of poses.
Where does a pose begin and end?
- In between two poses, there is always a transition from one to the other.
- The transition into a pose is included in the annotation; the transition out of the pose (and into the next pose) is not included.
- This means you start a new annotation at the moment the configuration begins to change.
- In the example below, for instance, the eyebrows go from a neutral pose to a raised pose. You annotate this on the 'p.eyebrows' tier as follows:

Movements
What are movements?
- Definition: a movement of a part of the face or body from a certain start configuration, sometimes via a series of intermediate configurations, to a certain end configuration.
- Movements are characterized by a certain temporal progression, and can therefore never be identified on the basis of a single video frame.
- On movement tiers, only movement events are annotated. If there is no movement, then nothing is annotated. You never use the label neutral on a movement tier.
Where does a movement begin and end?
- A movement begins at the moment that the movement is initiated from the start configuration and ends when the end configuration is reached.
- For instance, the annotation for a blink ('m.eyeblink' tier) starts at the moment the eyelids are going to close, and ends when the eyes are opened again.
- Sometimes, the initial and final configuration of the movement differ from each other because a new pose is taken up at the same time. For instance: someone starts with her head in neutral position ('p.head.rotated.up-down': neutral) and repeatedly shakes her head ('m.head.shakes': shaking). At the same time, she moves into a new pose ('p.head.rotated.up-down': down). Thus, the position of the head at beginning and at the end of the headshake differ.
4. ELAN
What is ELAN?
- ELAN is an annotation tool that is often used in research on sign languages and multimodal communication. With ELAN, one can add textual annotations to audio or video recordings.
- ELAN can be downloaded here .
- The full ELAN documentation is available here .
- Short ELAN tutorials for beginners – in Sign Language of the Netherlands (NGT) and English (voice-over/subtitled) – are available on ELANport .
- A quick guide to using ELAN is available here .
Annotating in ELAN: the basics
- Annotations in ELAN can take the form of a sentence, word, gloss, or comment.
- It is possible to create a list of possible annotation labels – a Controlled Vocabulary – in advance. This allows annotators to efficiently pick labels from a list.
- Annotations can be added on multiple layers; these are called tiers. Tiers are hierarchically organized. Annotations that are added to tiers, are temporally aligned with the video data.
- Annotations can be saved as text documents with the extension .eaf. A set of tiers can be saved as a template in an .etf file. Accompanying Controlled Vocabularies are saved as .ecv files.
5. The annotation template
Using the template
To facilitate the annotation of non-manual elements according to the guidelines we describe here, we have developed an ELAN annotation template. The template and supplementary materials can be downloaded here .
- Annotation template (.etf)
- Go to Files > Annotation template
- Controlled Vocabularies (.ecv)
- Go to Files > Annotation template
- Example annotations (.eaf)
- Go to Files > Example annotations
- Example annotation video (.mp4)
- Go to Files > Example annotations
- For use, download the template (.etf file) and the accompanying Controlled Vocabularies (.ecv file) and save them on your computer.
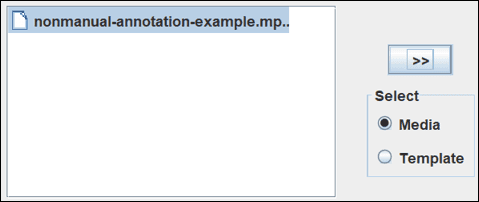
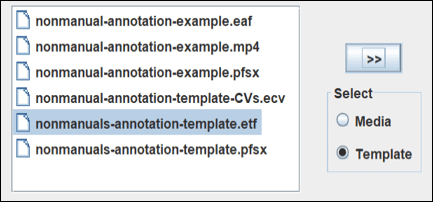
- If you are going to annotate a new video file, then go to File > New… in ELAN. Then select the desired video files. Make sure that ‘Media’ is checked and press ‘>>’. Do the same for the template file (select ‘Template’ first):
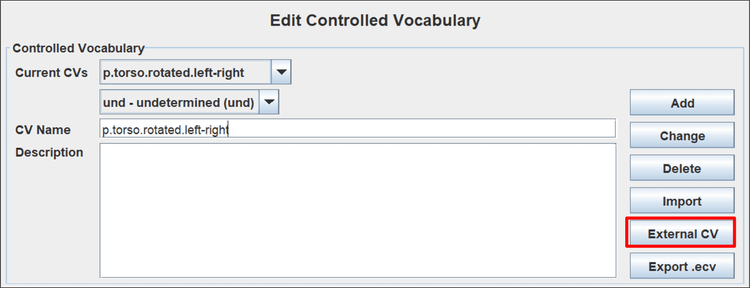
- If this hasn’t already happened automatically, also load the Controlled Vocabularies via Edit > Edit Controlled Vocabularies… > External CV > Browse… Find the folder in which you saved the .ecv file, select the file, and click OK.
Now you see something like this:
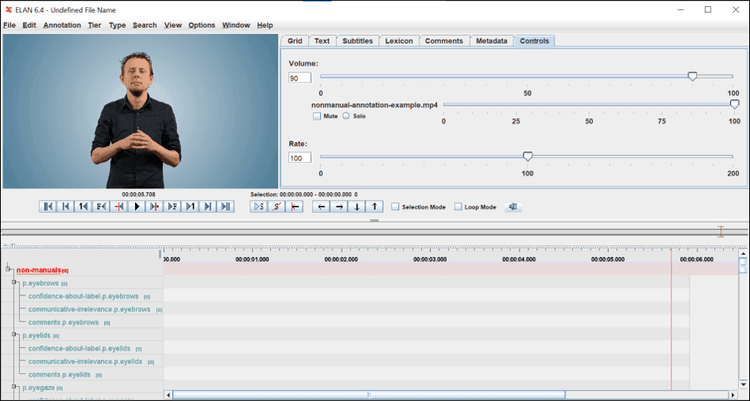
The structure
The annotation template has three levels:
- Level 1: One tier on which the relevant annotation units in the video are indicated.
- Level 2: A set of 21 tiers on which all non-manual elements are annotated.
- Level 3: A set of tiers on which annotators provide additional information about the labels that were selected on Level 2 tiers.
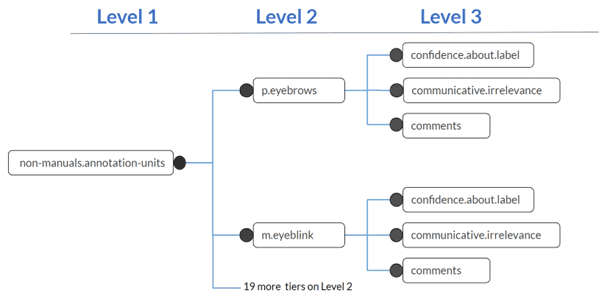
- Level 1: There is only one tier on this level. This tier is called 'non-manuals.annotation-units'. On this tier, it is indicated which segments of the video contain non-manual elements that should be annotated. Every segment receives a label.
- Level 2: There are 21 tiers on Level 2. These are all daughter tiers of the main tier 'non-manuals.annotation-units'. On every Level-2 tier, a different non-manual element is annotated. Which element that is, is indicated by the tier name (e.g., 'p.eyebrows'). A distinction is made between pose tiers and movement tiers (see Section 3).
- Level 3: Every Level-2 tier has three daughter tiers on Level 3. On these tiers, confidence scores and other additional information is given about the Level-2 annotations.
Level 1
Marking and labeling relevant segments in the video
Two functions of the main tier
- There is one Level-1 tier: 'non-manuals.annotation-units'.
- Annotations on this tier have two functions:
- To indicate the scope of the relevant annotation units;
- To provide every annotation unit with a label.
What is the scope of an annotation unit?
- The scope of an annotation unit depends on the type of study. For example:
- If the research focuses on non-manual elements accompanying independent signs, the scope of each annotation unit may be an independent manual sign.
- If the research focuses on the non-manual marking of questions, the scope of each annotation unit may be an entire sentence.
- What the scope of annotation units in a particular study has to be, should be determined by the researchers prior to data annotation.
- The researchers should also precisely define when, for instance, a sentence or manual sign begins and ends.
What kind of label does an annotation unit receive?
- Every annotation unit gets its own label.
- Labels on the 'non-manuals.annotation-units' tier can be chosen freely. Therefore, there is no Controlled Vocabulary for this tier. What kind of labels are used, is determined by the researchers.
- Labels can be used, for instance, to number annotation units, to indicate the experimental condition, to refer to the participant (number) in the video, or a combination of these.
Two examples
- Example 1: You are annotating data for an experiment that investigates singular and plural forms of signs. You are annotating at the level of the manual sign.
- Possible labels could be: plural_1_P01, plural_2_P01, singular_1_P01, singular_2_P01, etc., for participant 1, plural_1_P02, plural_2_P02, singular_1_P02, singular_2_P02, etc., for participant 2.
- Example 2: You are annotating a short monologue from one signer or speaker. The study concerns the non-manual marking of different sentence types (declaratives, questions, imperatives). You are annotating at sentence level and you number each sentence. Example (from example annotations):

Adding annotations on the 'non-manuals.annotation-units' tier
- Determine where your annotation unit should start and end by watching the video material. Select precisely that part by dragging your mouse. The selected part turns blue/purple:

- Then on the 'non-manuals.annotation-units' tier, double click on the selected part and add your text of choice. Result:

Level 2
Labeling non-manual elements
- On Level-2 tiers, you annotate all non-manual elements you observe and which are relevant for the study.
- Every element is annotated on a separate tier. The element is indicated by the tier name (e.g., p.eyebrows).
- In total, there are 21 Level-2 tiers.
- Every Level-2 tier is a daughter tier of the main tier 'non-manuals.annotation-units' (Level 1) and has two daughter tiers in turn (Level 3).
- For background on how we arrived at the proposed level-2 tier set, see Section 7.
Pose tiers and movement tiers
- We make a distinction between tiers that describe poses and tiers that describe movements.
- Pose tiers start with a p (e.g., 'p.nose').
- Movement tiers start with an m (e.g., m.nose).
- See Section 3 for a detailed explanation of the distinction between poses and movements.
Hiding irrelevant tiers in ELAN
- For many studies, not all tiers in the template will be relevant.
- If your study is about head movements, for instance, then you may only need the tiers starting with 'm.head…'
- Tiers irrelevant for your study can be hidden in ELAN.
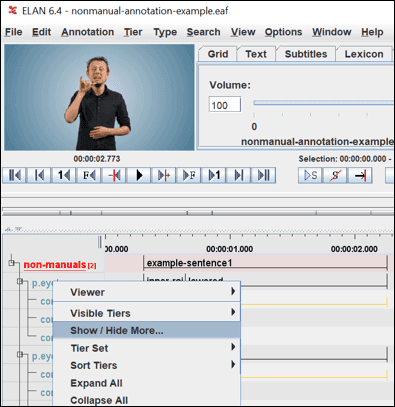
- In ELAN, right-click on the tier structure (left) and select Show / Hide More…
- Uncheck the irrelevant tiers.
Choosing annotation labels
- Once you have made your tier selection, you can start adding annotation labels on each tier.
- In Section 6, we show for each Level-2 tier which annotation labels there are. With the use of images and videos, we illustrate when these labels apply.
- In the next few slides, we offer some general recommendations and instructions for choosing the right label.
- Remember that you annotate based on form where possible, and based on comparison where necessary (see Section 2).
Annotate per video or per tier?
- We recommend that you add annotations per tier, not per video.
- That is, if you have a data set which contains multiple videos, then pick a tier first (e.g., 'p.eyebrows') and add annotations on it for all videos in the data set.
- Then move on to the next tier, and add annotations on this tier for all videos. And so forth.
Annotating poses
- All pose tiers are of the tier type Time Subdivision.
- This means that annotations added on these tiers must always fall within the scope of the annotations on the main tier and that the annotations taken together cover the entire scope of the annotations on the main tier.
- An example:

- To add annotation labels to pose tiers, first select the annotation unit you would like to annotate (on Level 1).
- Then double click on the Level-2 tier you would like to annotate. A list of possible annotation labels (the Controlled Vocabulary) appears.

- Select the label you would like to use and hit Enter:

- If you would like to annotate multiple labels within the same annotation unit, then right-click on the first annotation you already added and select New Annotation After (or Alt+shift+N [Windows]).

- Choose the correct label and also make sure that your annotations have the right scope. Do this by hovering your mouse over the boundary between the two annotations. Then press Alt and drag the boundary to the left or right with your mouse. This should result in something like this:

- For two pose tiers, namely 'p.eyegaze' and 'p.mouth.configuration', there is also a label no_pose available.
- For the 'p.eyegaze' tier, you use this label when the eyes of the participant are closed. In that case, no eyegaze pose can be determined.
- For the 'p.mouth.configuration' tier, you use this label when there is a mouthing or a mouth action (you annotate these elements on the ‘m.mouth.action’ and ‘m.mouth.mouthing’ tiers, see Section 6). In case there is no mouthing or mouth action, and the mouth is in neutral position, you choose the label neutral.
Annotating movements
- All movement tiers are of the tier type Included In.
- This means that annotations you add on these tiers must always fall within the scope of the annotation units on the main tier.
- An example:

- To add an annotation on a movement tier, select the part you wish to add the annotation to.
- Click on the selected part, and select the correct label from the Controlled Vocabulary.
- If there are no further movement events, you just leave the rest of the tier empty. It is possible that there are annotation units to which you do not need to add any annotations at all on the various movement tiers.
- For example: as long as the person on the video does not blink their eyes, no annotation needs to be added on the 'm.eyeblink' tier.
Level 3
Adding extra information
- On the Level-3 tiers, you provide extra information about the annotations you added on Level 2.
- Every Level-2 tier has three daughter tiers on Level 3:
- 'confidence.about.label'
- 'communicative.irrelevance'
- 'comments'
- Especially the 'confidence.about.label' tier is important; see the discussion about annotation strategies in Section 2 for details.
Relation between Level-2 and Level-3 tiers
- Level-3 tiers are all Symbolic Association tiers.
- This means that, for every annotation on a Level-2 tier, you can add at most one annotation on every daughter tier at Level 3.
- For instance, you cannot give two different confidence scores to the same annotation.
Tier: 'confidence.about.label'
- For every annotation on Level 2, you should indicate on the Level-2 tier confidence.about.label how certain you are that you chose the most fitting label. There are three options:
- High: You are as good as certain that you chose the most fitting label. You have chosen the label purely based on form.
- Medium: You believe you have chosen the most fitting label, but there is a chance that a different label is more appropriate in the end. You have chosen the label based on a combination of form and comparison.
- Low: You are in doubt about the label you have chosen; it is quite probable that a different label is actually more fitting. You have chosen the label purely based on comparison.
- It is important to add confidence scores to your annotations because it makes it possible to use this information later on when the data is analyzed.
- The researcher may, for instance, choose to only consider annotations with high or medium confidence scores, while leaving the annotations with low scores out of the analysis.
- The expectation is that, if two annotators both give a high confidence score to an annotation, they are also more likely to agree about the label. In other words, annotations with a high confidence score are expected to be more reliable.
- If the same annotation procedure, including the use of confidence scores, is used in multiple studies, then the results of these studies can be compared with each other more easily.
Tier: 'communicative.irrelevance'
- The tier 'communicative.irrelevance' has a Controlled Vocabulary with only one option: irrelevant.
- You apply this label when it is evident that the non-manual configuration or movement which you have annotated on Level 2 clearly has no communicative function.
- Think, for instance, of a body moving forward because the signer is picking up a coffee cup off a table, or a head abruptly turning sideways because someone suddenly enters the room.
- Communicatively irrelevant non-manual elements are annotated on Level 2, because these tiers are concerned with form – and not function.
- The 'communicatie.irrelevance' tier makes it possible to exclude this type of annotations from further analysis.
Tier: 'comments'
- For every Level-2 annotation, there is the option to add a comment on the 'comments' tier.
- The 'comments' tier does not have a Controlled Vocabulary: you may freely choose what sort of text to add.
- You may also leave this tier empty.
6. Annotation labels
Eyes
p.eyebrows
- Pose tier: Eyebrows
- Labels: neutral – raised – lowered – inner-raised
neutral
Choose the label neutral if the eyebrows are in their neutral state. In a neutral state, there is no activation of the eyebrow muscles, see the following images:
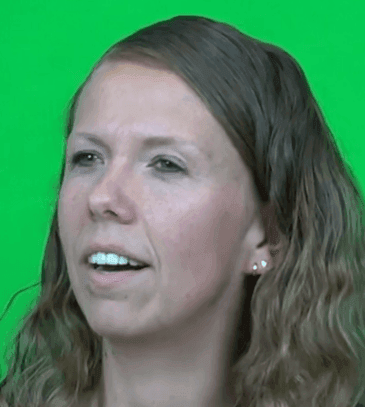
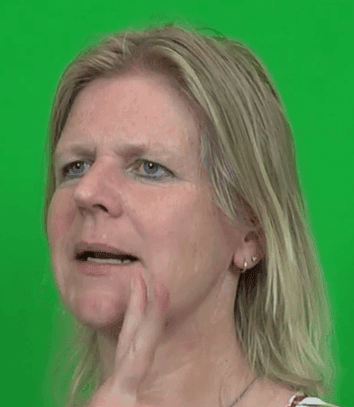
Tip: You can establish the neutral eyebrow position by looking at other frames that show the same person, earlier or later in the video. If the person relaxes their eyebrows, they are in a neutral state.
raised
Choose the label raised if the eyebrow muscles are activated and the brows are raised in their entirety (so both the inner and outer parts), see the following images:
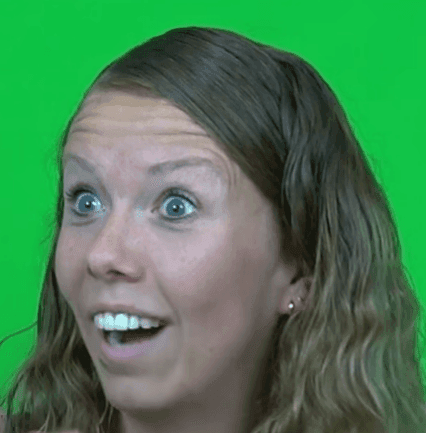

Tip: Horizontal wrinkles often appear on the forehead when the eyebrows are raised. This may help, but be cautious: this does not apply to every signer!
lowered
Choose the label lowered if the eyebrow muscles are activated and the eyebrows are lowered in their entirety (so both the inner and outer parts), see the following images:
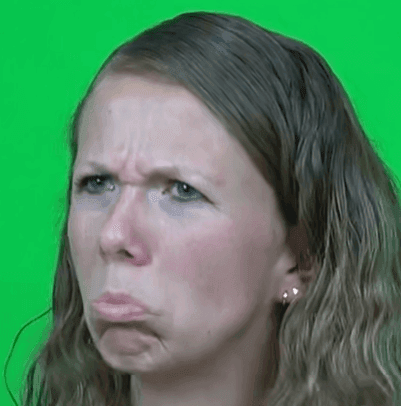
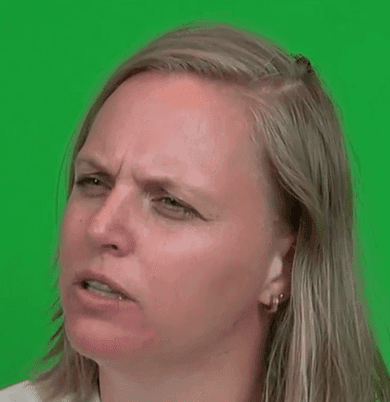
Tip: Wrinkles often appear in between the eyebrows when they are lowered. Pay attention to the difference between inner-raised and lowered eyebrows: Both eyebrow positions often result in wrinkles between the brows, but an inner-raised position often also results in horizontal wrinkles on the forehead. This is almost never the case when the brows are lowered.
inner-raised
Choose the label inner-raised if the inner parts of the brows are raised. The outer parts of the brows are either in a neutral position or lowered, see the following images:
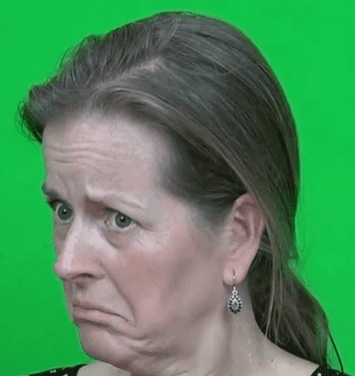


Tip: When the inner part of the brows is raised, this often results in wrinkles in between the brows and horizontal wrinkles on the forehead. This is shown on the middle and right-most images.
Pay attention: Not everyone is capable of raising only the inner parts of their brows. Choose a different label if it is unclear whether the brow position is inner-raised.
p.eyelids
- Pose tier: Eyelids
- Labels: neutral – squinted – widened – closed
neutral
Choose the label neutral if the eyelids are relaxed and in their neutral state, as in the following images:
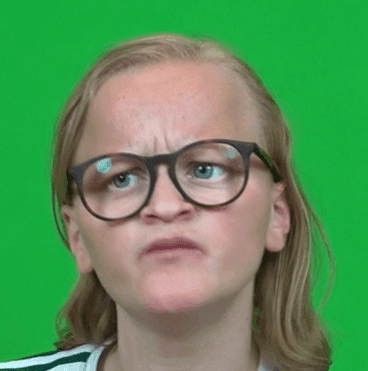

Tip: You can establish the neutral eyelids position by looking at other frames that show the same person, earlier or later in the video. If the person relaxes their eyelids, they are in a neutral state.
Pay attention: The eyelids are separated from the eyegaze. If the eyeballs are directed upwards/downwards, the eyelids may seem widened/squinted. However, if the eyelids are relaxed, choose the label neutral anyway.
squinted
Choose the label squinted if the eyelids are tense and squeezed. In this state, the eyeballs are less visible, as seen in the following images:
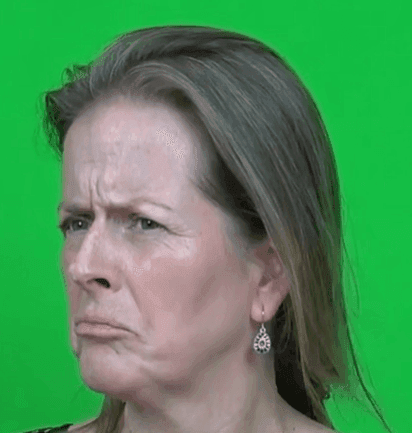
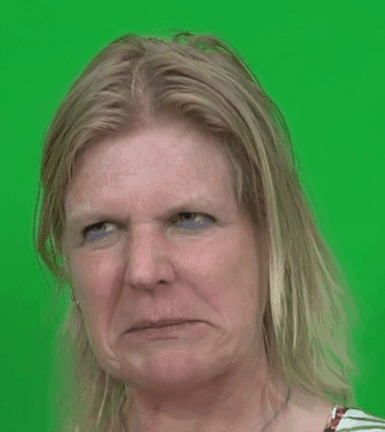
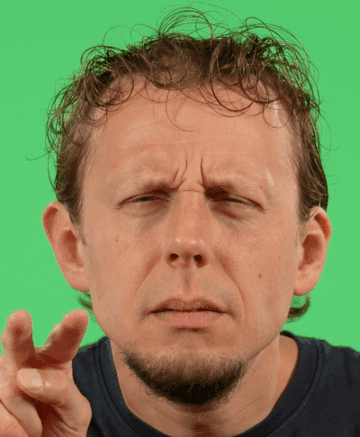
Tip: Small wrinkles often (but not always) appear around the eyes if the eyelids are squinted. This may be helpful.
widened
Choose the label widened if the eyes are wide open. The eyeballs are clearly visible, as in the following images:
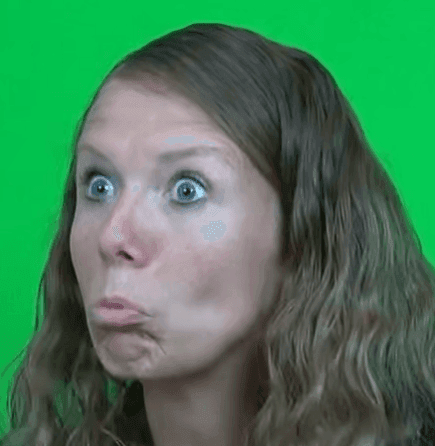


closed
Choose the label closed if the eyes are closed for an extended period of time, see the following image:

Pay attention: closed is a pose and only applies if the eyes are closed for a certain amount of time. This is different from the label blink, which concerns a movement (the eyes closing and opening, blinking), and which should be annotated on a separate movement tier (m.eyeblink).
p.eyegaze
- Pose tier: eye gaze
- Labels: addressee – researcher – space – no_pose
addressee
Choose the label addressee if the gaze of the signer is directed at their interlocutor or at the camera, as in the image below:

Tip: Determine the interlocutor’s position in the room to decide if the signer’s gaze is directed at them. If there is no interlocutor, this label does not apply.
researcher
Choose the label researcher if the signer’s gaze is directed at the researcher (who is not an active conversation partner), see the following image and video:
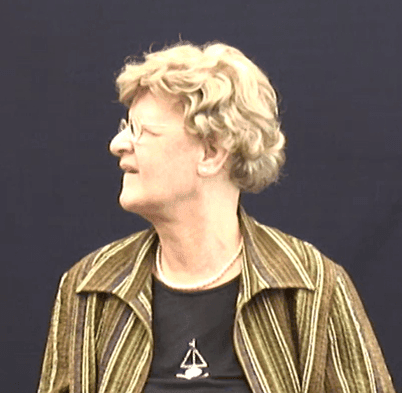
Tip: Determine the researcher’s position in the room to decide if the signer’s gaze is directed at them. If the researcher is standing behind the camera, the signer may look over the camera.
If there is no researcher present, this label does not apply.
space
Choose the label space if the signer’s gaze is directed at a point in space, see the following images:

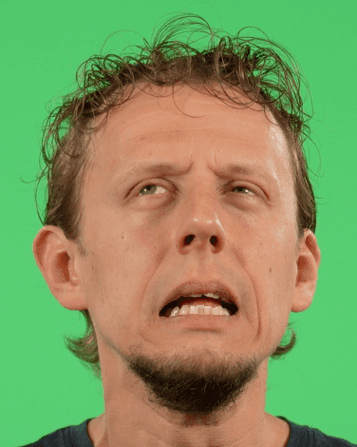
Tip: If the signer is not looking towards the researcher or addressee (if present), but into space, choose space.
no_pose
Choose the label no_pose on this tier if the eyes are closed, which means that the gaze direction cannot be determined.
Closed eyes should be annotated on the ‘p.eyelids’ tier; see the label closed on that tier for more information. See the image below for an example of closed eyes.
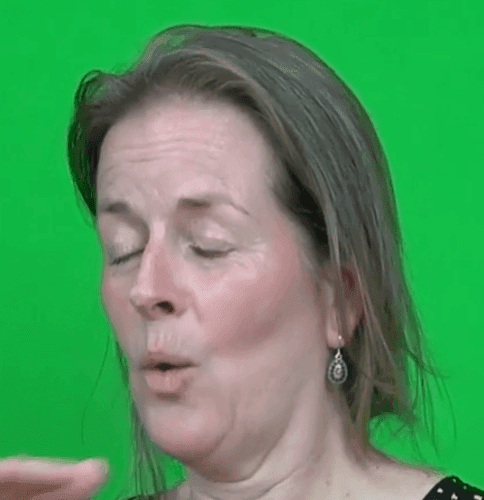
m.eyeblink
- Movement tier: Eye blinking
- Labels: blink – blinking – wink – winking
blink
Choose the label blink if both eyes close and open once within a short time span, see the video below:
Pay attention: Only choose blink if the eyes close and open once. If the eyes close and open repeatedly and successively, choose blinking.
Pay attention: The label blink on the m.eyeblink tier should be distinguished from the label closed on the p.eyelids tier. While blink is a movement, closed is a pose. Annotate closed if the eyes stay closed for a certain amount of time.
blinking
Choose the label blinking if both eyes close and open repeatedly within a short time span, see the video below:
Pay attention: Annotate blinking only if the eyes close and open repeatedly and successively. If the eyes close and open only once, annotate blink.
wink
Choose the label wink if one of the eyes closes and opens once, while the other eye stays open, see the video below:
Pay attention: Annotate wink only if the eye closes and opens once. If the eye closes and opens repeatedly and successively, annotate winking.
winking
Choose the label winking if one of the eyes closes and opens repeatedly and successively, while the other eye stays open, see the video below:
Pay attention: Annotate winking only if the eye closes and opens repeatedly and successively. If the eye closes and opens once, annotate wink.
Nose
p.nose
- Pose tier: Nose
- Labels: neutral – wrinkled
neutral
Choose the label neutral if the nose is in its neutral position. There is no activation of the muscles in the nose, see the following images:
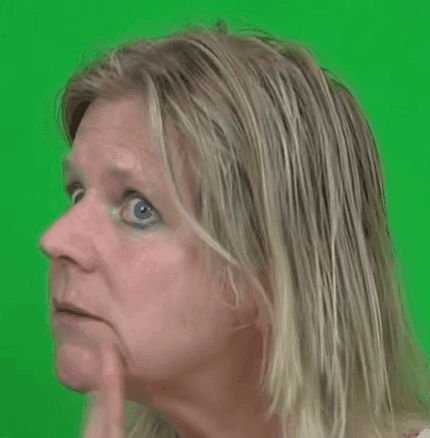
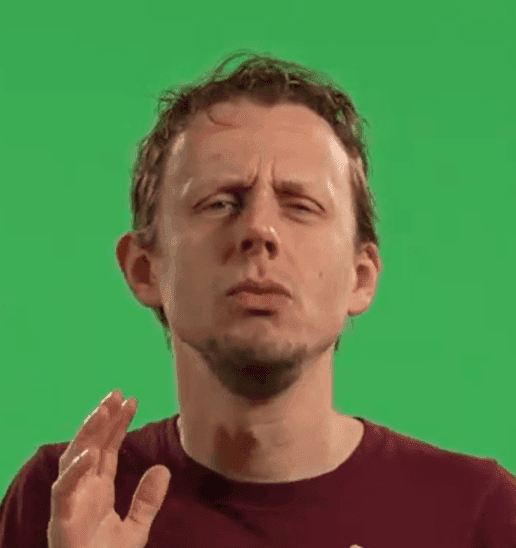
Tip: You can establish the neutral nose position by looking at other frames that show the same person, earlier or later in the video. If the person relaxes their nose, it is in a neutral state.
wrinkled
Choose the label wrinkled if the nostrils are wrinkled for an extended period of time. There is activation of the muscles in the nose, see the following images:
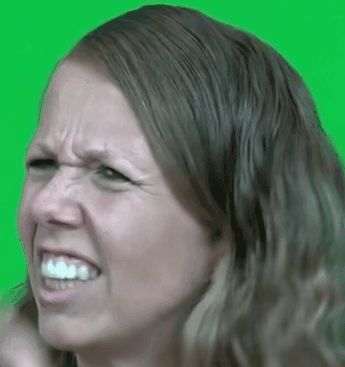
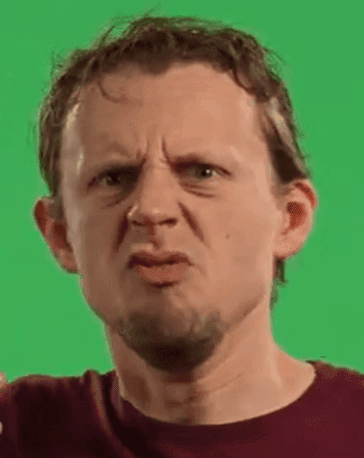

Tip: Small wrinkles often appear around the nose if the nose is wrinkled, especially in between the eyebrows and below the eyes; the nostrils are often somewhat higher and wider.
Pay attention: This is a pose. If there are wrinkling movement(s), annotate wrinkle or wrinkling on the m.nose tier.
m.nose
- Movement tier: Nose
- Labels: wrinkle – wrinkling
wrinkle
Choose the label wrinkle if the nostrils wrinkle once, and then relax again, within a short time span, see the following videos:
Pay attention: Only annotate wrinkle if the nostrils make a single wrinkle movement. If the nostrils make multiple wrinkle movements, annotate wrinkling.
Pay attention: This is a movement. If there is no wrinkle movement, but the nose is wrinkled for a longer period of time, annotate wrinkled on the p.nose tier.
wrinkling
Choose the label wrinkling if the nostrils wrinkle and then relax again multiple consecutive times, see the video below:
Pay attention: Only annotate wrinkling if the nostrils make multiple wrinkle movements. If the nostrils make only one wrinkle movement, annotate wrinkle.
Mouth
p.mouth.configuration
- Pose tier: Mouth configuration
- Labels: neutral – pucker – pout – frown – smile – no_pose
neutral
Choose the label neutral if the mouth is in its neutral state. The lips are relaxed and usually closed, or at most slightly apart (right image). See the following images:

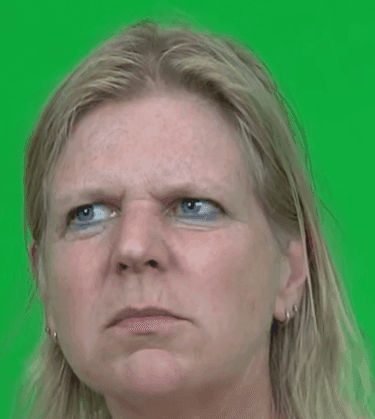

Tip: You can establish the neutral mouth position by looking at other frames that show the same person, earlier or later in the video. If the person relaxes their lips, the mouth is in a neutral state.
pucker
Choose the label pucker if the lips are puckered. Both the upper and lower lips are tensed, see the following images:
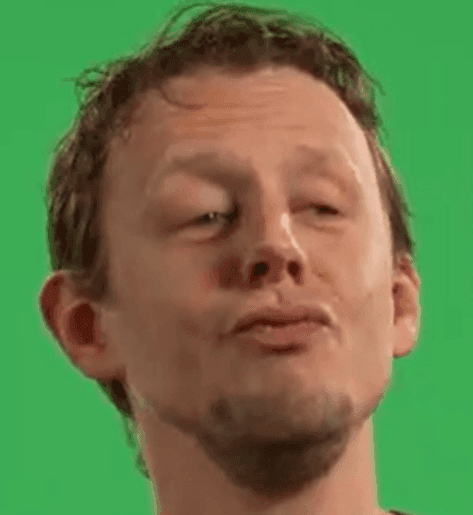
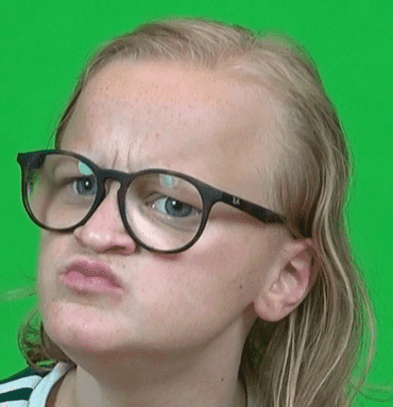

Tip: For some signers, small wrinkles may occur around the lips if they are puckered (as shown on the rightmost picture).
Pay attention to individual differences in the size of the lips.
pout
Choose the label pout if the lips are pouting. The lower lip is pushed forward and the inside of the lower lip is visible, see the following images:
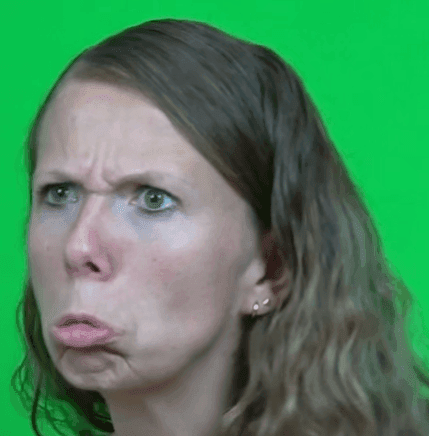

Tip: For some signers, wrinkles occur on the chin if the lips are pouting, as shown on the left image.
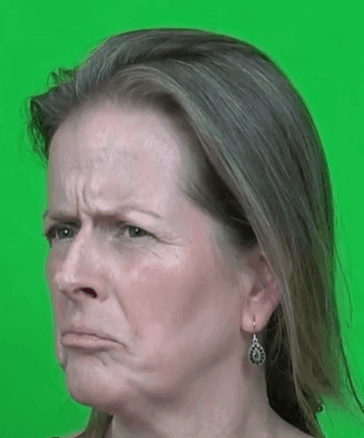
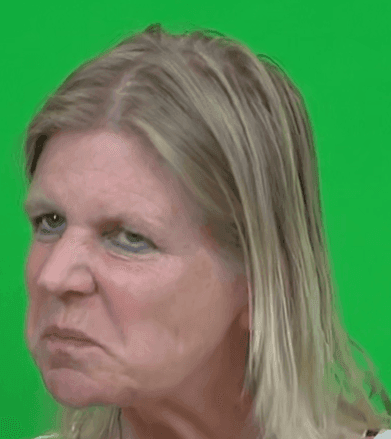
frown
Choose the label frown if the corners of the mouth are tense and directed downwards, see the following images:

smile
Choose the label smile if the signer is smiling. The corners of the mouth are tense and directed upwards, see the following images:


Tip: A smile often results in a rounding of the cheeks, as shown on the images.
no_pose
Choose the label no_pose on the p.mouth.configuration tier if there is a mouth action or mouthing. Those are movements and should be annotated on the m.mouth.action and m.mouth.mouthing tiers. See the descriptions of those tiers in the following.
m.mouth.action
m.mouth.mouthing
Head
p.head.forward-backward
Pose tier: Head forward/backward
Labels: neutral – forward – backward
neutral
Choose the label neutral if the head is in its neutral position (so not forward or backward), see the following images:
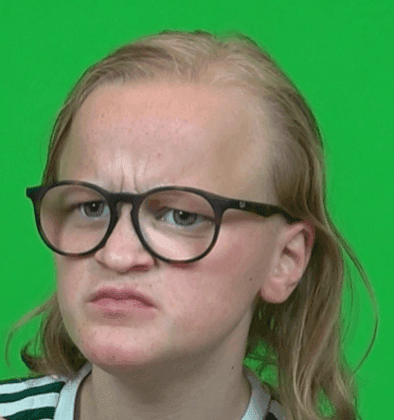
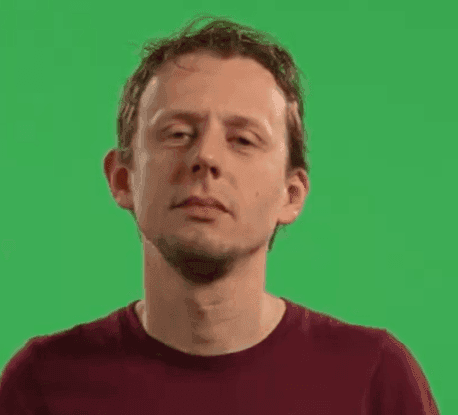

Tip: This pose occurs frequently if the person does not say or sign anything (though this is not always the case).
forward
Choose the label forward if the head is directed forward, see the following images:
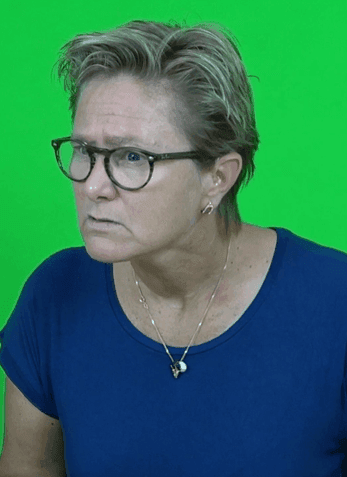
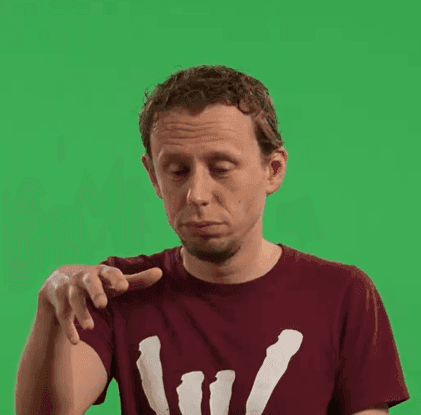

Tip: To determine whether the head is forward, it can be helpful to view the signer from the side view, if available.
backward
Choose the label backward if the head is pulled backward, see the following images:
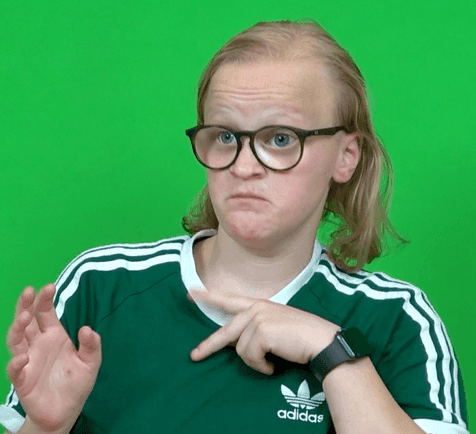

Tip: To determine whether the head is backward, it can be helpful to view the signer from the side view, if available.
General recommendations
1: Combinations of poses and movements
- There are both pose and movement tiers for the head.
- Sometimes, a pose and a movement may combine.
- For example: if the head is rotated upwards, this is annotated as rotated-up on the p.head.rotated.up-down tier (a pose tier). The signer may be nodding at the same time; this is annotated as nodding on the m.head.nods tier.
- In cases like the one described above, always annotate both the pose and the movement.
- Tip: Carefully look at the start and end points of the movement and the pose (for example, at the start point of the nodding, is the head rotated upwards or neutral?).
2: Annotate form, not meaning
- The labels on the head tiers are about the form of the non-manual elements.
- For example: you may associate shaking of the head (m.head.shakes) with negation, but sometimes, it may have a different meaning.
- So, when annotating, initially focus on the form only.
3: Different directions on the pose tiers
- There are four different pose tiers for the head.
- Pay attention: these tiers are about different directions. For example: if the head is tilted to the left, this is annotated as tilted-left on the p.head.tilted.left-right tier.
- It may well be that the head is neutral on the other pose tiers; for example, if the head is not directed forward or backward, but only tilted to the left, then neutral should be annotated on the p.head.forward-backward tier.
So keep a close eye on which direction should be annotated on each pose tier!
p.head.tilted.left-right
Pose tier: Head tilted left/right
Labels: neutral – tilted-left – tilted-right
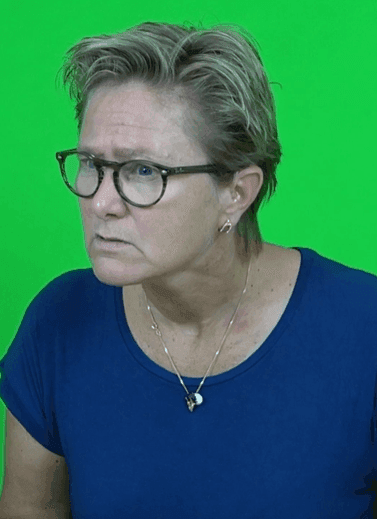
neutral
Choose the label neutral if the head is in its neutral position (so not tilted to the left or the right), see the following images:

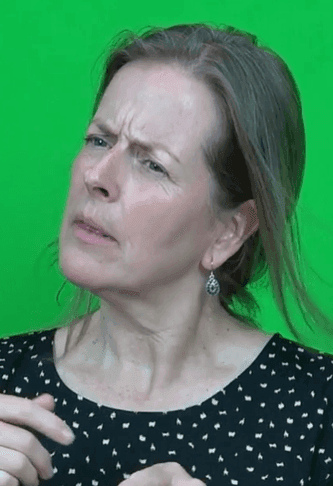
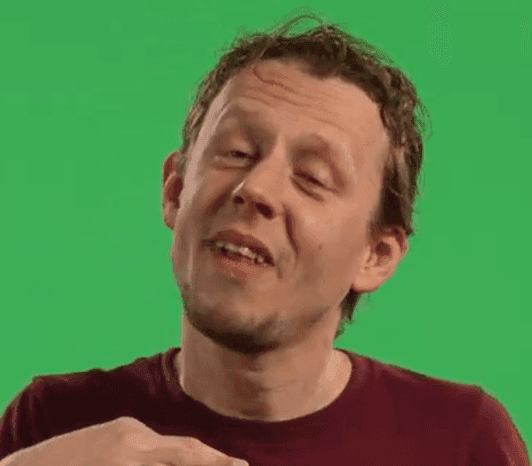
tilted-left
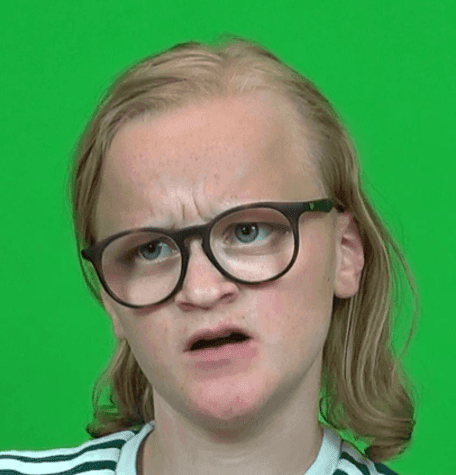
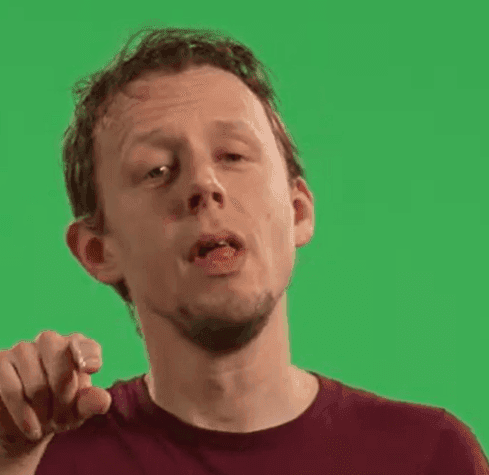
Choose the label tilted-left if the head is tilted to the left (the left ear towards the left shoulder). This refers to the left from the signer’s perspective (not from the annotator’s perspective), see the following images:
tilted-right
Choose the label tilted-right if the head is tilted to the right (the right ear towards the right shoulder). This refers to the right from the signer’s perspective (not from the annotator’s perspective), see the following images:
p.head.rotated.up-down
Pose tier: Head rotated up/down
Labels: neutral – rotated-up – rotated-down
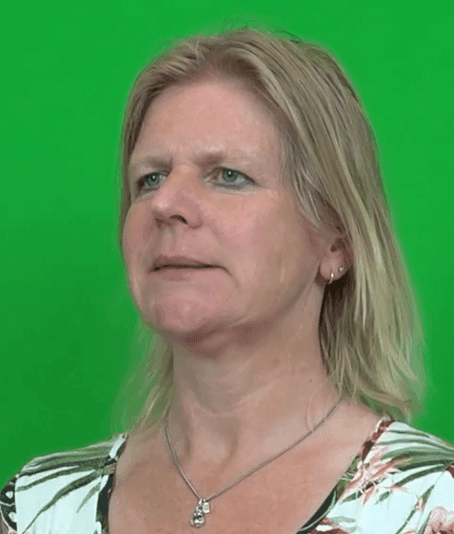
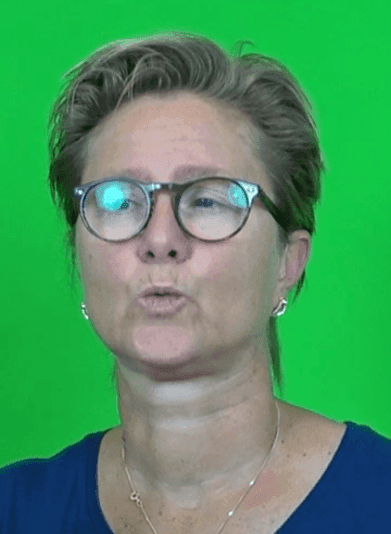
neutral
Choose the label neutral if the head is in its neutral position (so not rotated up or down), see the following images:
rotated-up
Choose the label rotated-up if the head is rotated up. The back of the head is directed towards the neck and the nose sticks up, see the following images:
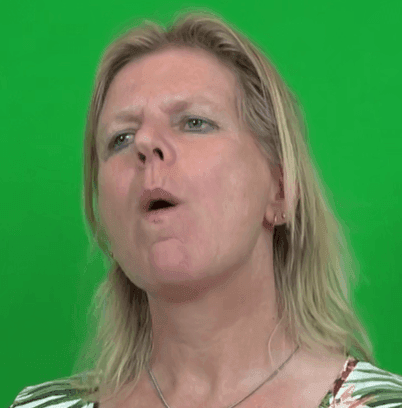
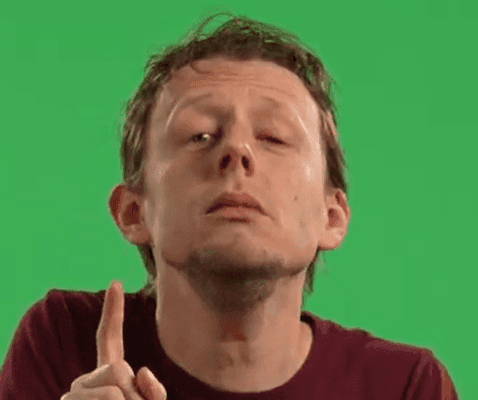
Pay attention: Rotated-up is a pose (the head is rotated up for a longer period of time), and should be distinguished from the movement nod(ding), which should be annotated on the m.head.nods tier.
rotated-down
Choose the label rotated-down if the head is rotated down. The chin is directed towards the neck and the nose points downwards, see the following image and video:
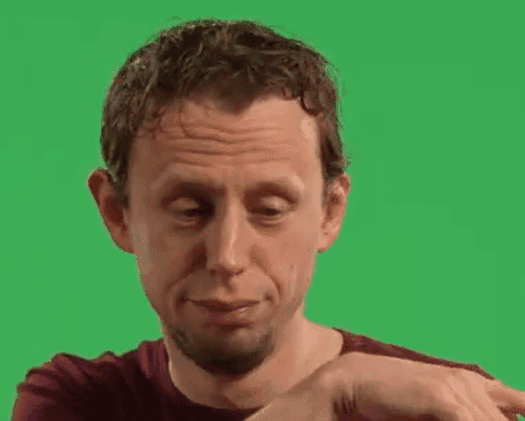
Pay attention: Rotated-down is a pose (the head is rotated down for a longer period of time), and should be distinguished from the movement nod(ding), which should be annotated on the m.head.nods tier.
p.head.rotated.left-right
Pose tier: Head rotated left/right
Labels: neutral – rotated-left – rotated-right
neutral
Choose the label neutral if the head is in its neutral position (so not rotated to the left or right), see the following images:
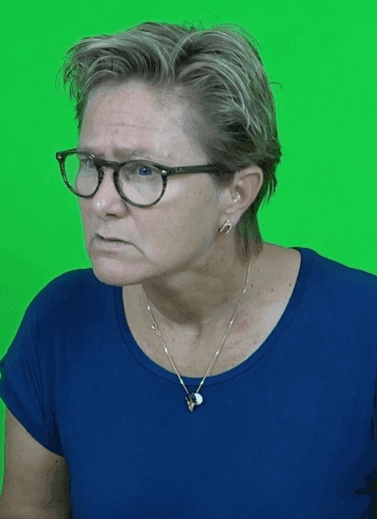

left
Choose the label left if the head is rotated to the left. This refers to the left from the signer’s perspective (not from the annotator’s perspective), see the following images:

right
Choose the label right if the head is rotated to the right. This refers to the right from the signer’s perspective (not from the annotator’s perspective), see the following images:

m.head.shakes
Movement tier: Headshaking
Labels: shake – shaking
shake
Use the label shake if the head moves once to the left or right and back, as in the video below:
Pay attention: Only use the label shake if the head moves to the left or right and back just once. If the head moves back and forth multiple times use the label shaking.
shaking
Use the label shaking if the head moves back and forth to the right or to the left multiple times, as in the video below:
Pay attention: Only use the label shaking if the head moves back and forth multiple times; otherwise use the label shake.
m.head.nods
Movement tier: Head nodding
Labels: nod – nodding
nod
Use the label nod if the head makes a nodding movement (down and back up) just once, as in the following video’s:
Pay attention: Only use the label nod if the head makes a nodding movement just once; if it nods repeatedly use the label nodding.
nodding
Use the label nodding if the head makes multiple nodding movements (down and back up), as in the video below:
Pay attention: Only use the label nodding if the head nods repeatedly, otherwise use the label nod.
m.head.bobbles
Movement tier: Head bobbling
Labels: bobble – bobbling
bobble
Use the label bobble if the head tilts to the left or right and immediately returns to a neutral position just once, as in the video below:
Pay attention: Use the label bobble only if the movement is made just once; if it is made multiple times use the label bobbling.
bobbling
Use the label bobbling if the head repeatedly tilts to the left or right and immediately returns to an upright position, as in the video:
Pay attention: Use the label bobbling only if the movement is made repeatedly; if it is made just once use the label bobble.
Shoulders
p.shoulders
Pose tier: Shoulders
Labels: neutral – raised
neutral
Use the label neutral if the shoulders are in their neutral position, as in the images below:
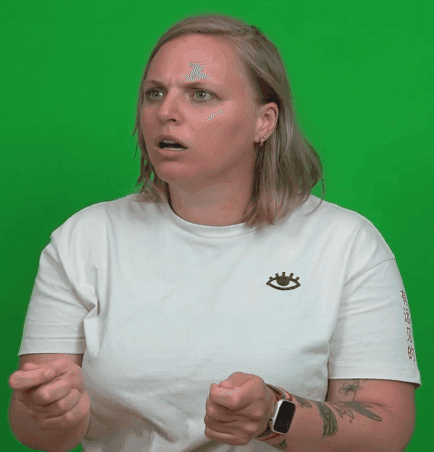

Tip: This pose frequently occurs when the person is not saying or signing anything (although this is not always the case).
raised
Use the label raised if the shoulders are raised, as in the images and video below:
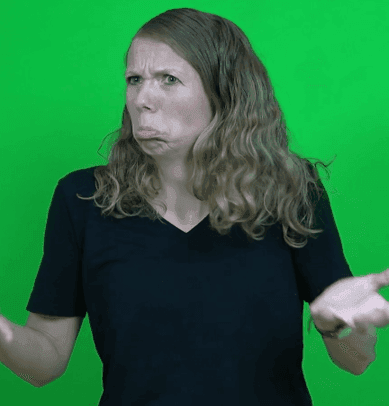
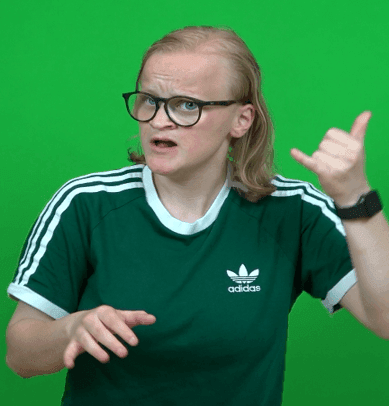
Pay attention: Raised is a pose (the shoulders are raised for an extended time segment). This is different from the movement shrug(ging), which is to be annotated on the m.shoulders tier.
m.shoulders
Movement tier: shoulders
Labels: shrug – shrugging
shrug
Use the label shrug if the shoulders move up and come down again just once, as in the video below:
Pay attention: Shrug is a movement, and should be distinguished from the pose raised, which is annotated on the p.shoulders tier.
Pay attention: Only use the label shrug if the shoulders move up and come down again just once. If this happens repeatedly, use the label shrugging.
shrugging
Use the label shrugging if the shoulders repeatedly move up and down, as in these videos:
Pay attention: Shrugging is a movement, and should be distinguished from the pose raised, which is annotated on the p.shoulders tier.
Pay attention: Only use the label shrugging if the shoulders move up and down repeatedly; if this happens just once use the label shrug.
Torso
p.torso.forward-backward
Pose tier: Torso forward/backward
Labels: neutral – forward – backward
neutral
Use the label neutral if the torso is not bent forward or backward, as in the images below:
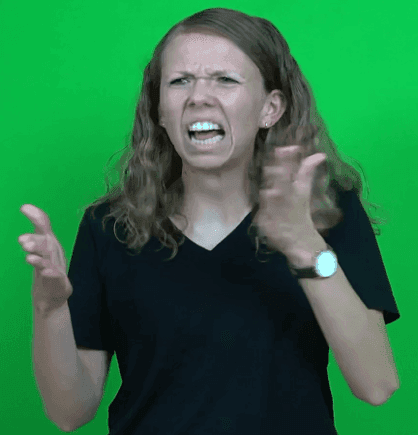
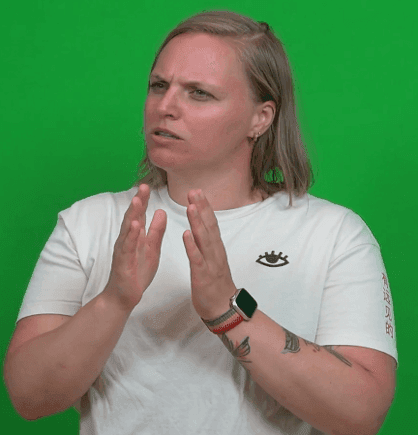
Tip: This often occurs when the person is not signing or speaking (although this is not always the case).
forward
Use the label forward if the torso is bent forward. This can be short or long, as long as the torso is visibly bent forward, as in the following image and video:
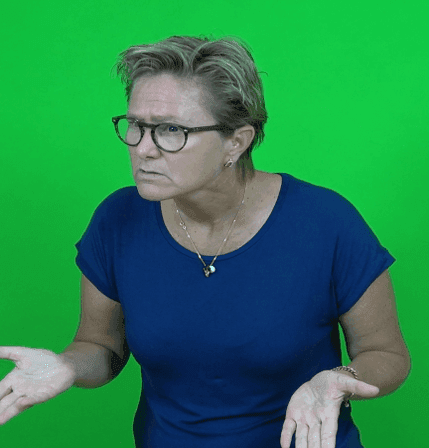
Tip: To determine whether the torso is bent forward, it helps to view the person from the side. So if a side view video is available, please use it.
backward
Use the label backward if the torso is bent backward. This can be short or long, as long as the torso is visibly bent forward, as in the following image and video:
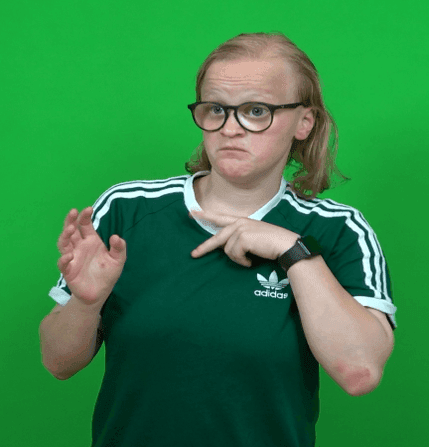
Tip: To determine whether the torso is bent backward, it helps to view the person from the side. So if a side view video is available, please use it.
General recommendations
Different pose tiers for different directions/axes
- There are three different pose tiers for the torso. These pertain to different directions/axes.
- For example: if the torso is tilted to the left, this is annotated with the label left on the tier p.torso.tilted.left-right.
- It is possible that the torso is otherwise in a neutral position; for instance, if it is not bent forward or backward, but only tilted to the left, then you use the label neutral on the tier p.torso.forward-backward.
So pay attention to the specific direction/axis that is relevant for a given pose tier!
p.torso.tilted.left-right
Pose tier: Torso tilted left/right
Labels: neutral – tilted-left – tilted-right
neutral
Use the label neutral if the torso is not tilted to the left or to the right, as in the following images:
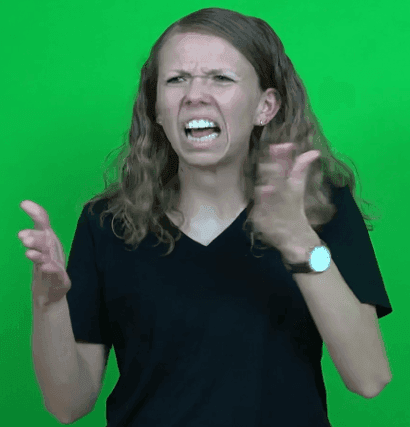
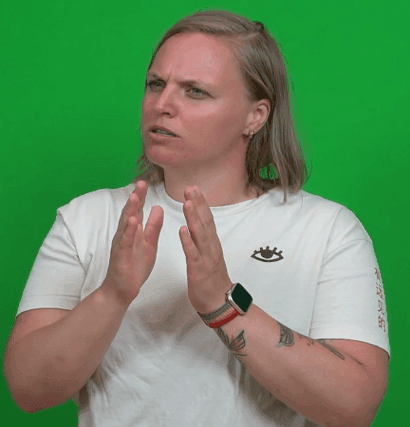
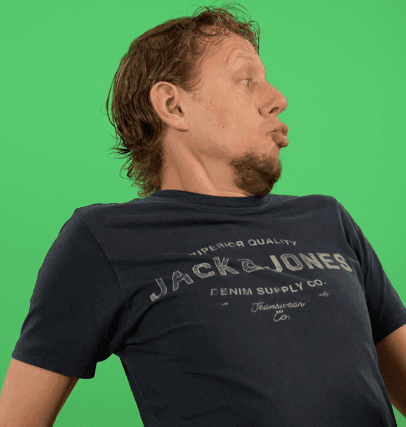
Tip: This often occurs when the person is not signing or speaking (although this is not always the case).
left
Use the label left if the torso is tilted or shifted to the left, either for a short or for a longer time interval. By ‘left’ we mean left for the person in the video (so not for the annotator), as in the following images:
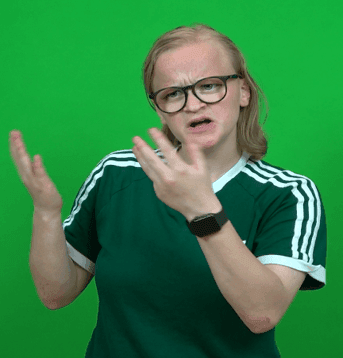
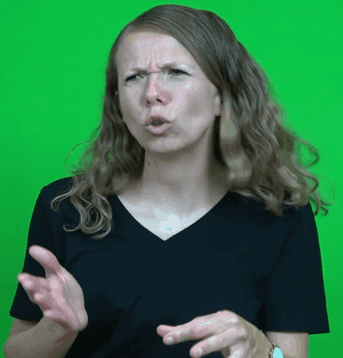
Tip: If the torso is tilted to the left, the right shoulder is often higher than the left shoulder (as seen in the image on the left). This is not necessarily the case, but can be a helpful indication.
right
Use the label right if the torso is tilted or shifted to the right, either for a short or for a longer time interval. By ‘right’ we mean right for the person in the video (so not for the annotator), as in the following images:
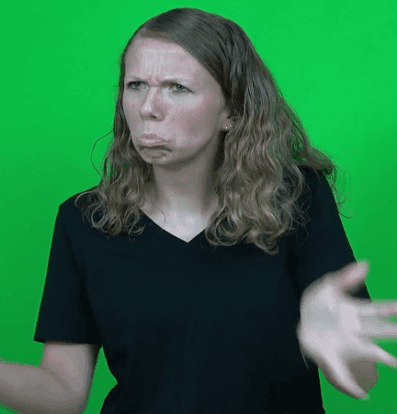
Tip: If the torso is tilted to the right, the left shoulder is often higher than the right shoulder (as seen in the image on the left). This is not necessarily the case, but can be a helpful indication.
p.torso.rotated.left-right
Pose tier: Torso rotated left/right
Labels: neutral – rotated-left – rotated-right
neutral
Use the label neutral if the torso is not rotated to the left or to the right, as in the following images:
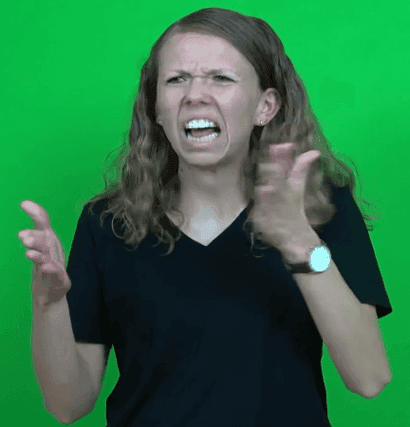
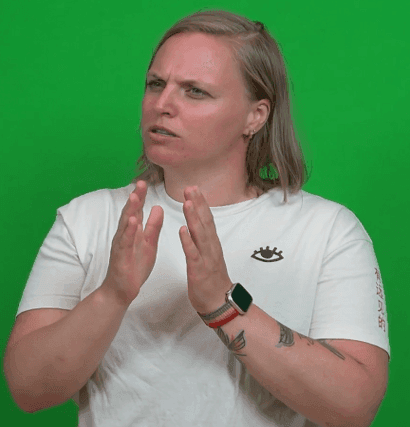
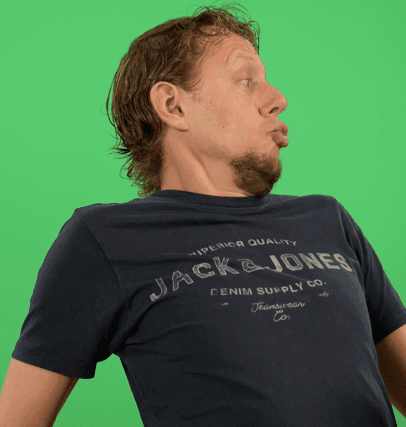
Tip: This often occurs when the person is not signing or speaking (although this is not always the case).
left
Use the label left if the torso is rotated to the left, either for a short time interval or for a longer one. By left we mean left for the person in the video (so not for the annotator), as illustrated in the image.
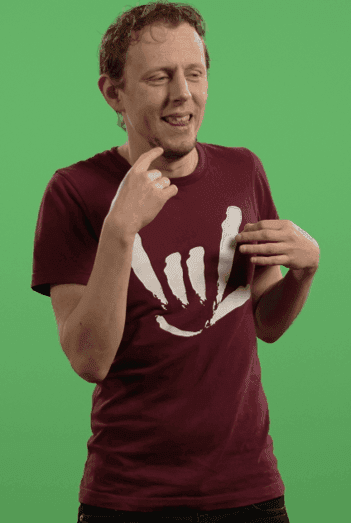
Tip: In sign language, the torso is often rotated to indicate a role-shift.
right
Use the label right if the torso is rotated to the right, either for a short time interval or for a longer one. By right we mean right for the person in the video (so not for the annotator), as illustrated in the image.
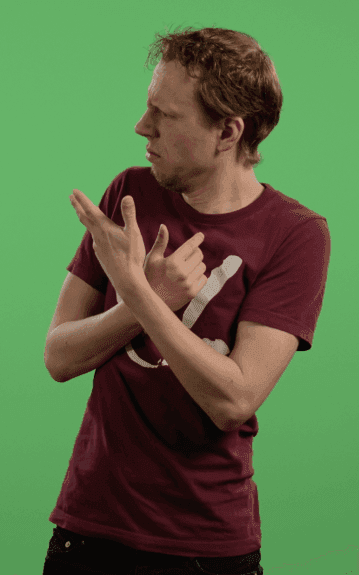
Tip: In sign language, the torso is often rotated to indicate a role-shift.
7. Background information and recommendations for researchers
Background of this project
- The first ‘Proof of Concept’ version of the annotation guidelines that the present guidelines are based on, were developed by Marloes Oomen and Floris Roelofsen in the context of a project on question sentences in NGT. This first Proof of Concept version of the guidelines is available here .
- Also see this publication about the development of the first version of the guidelines (published in the NELS53 proceedings).
- Based on these initial guidelines, a data set was annotated by Marloes Oomen and Tobias de Ronde in order to determine inter-annotator agreement.
- Lyke Esselink implemented an R script to analyze inter-annotator agreement. The results of this evaluation are published in a technical report .
- Based on the evaluation, recommendations for further improvement of the annotation guidelines were formulated and a new tier structure was proposed by Lyke Esselink, Marloes Oomen and Floris Roelofsen. These are also described in the technical report.
- The current ‘Prototype’ version of the guidelines (version 2.0) were developed based on the technical report. The guidelines were written by Marloes Oomen, Cindy van Boven, Tobias de Ronde, and Floris Roelofsen.
General recommendations for recording new video data
In case you are analyzing already existing data, you are dependent on the material that is available. But if you are going to collect new data, then we have the following recommendations for video recording, which will make the annotation process easier and more reliable:
- Ask participants not to wear glasses, hats, or other accessories that may obscure part of the face, if possible.
- Use multiple cameras to obtain at least one frontal and one side view. This facilitates the annotation of, in particular, the position of the head and torso.
- Use the frontal recording to also prepare a version of the video which zooms in on the face. Use this video to annotate the facial tiers (eyes, nose, mouth).
Why annotate non-manual elements?
Annotating non-manual elements is very difficult. Therefore, one might wonder whether we should attempt to do it at all. We see at least two reasons why we should.
Firstly, it is important to analyze non-manual elements in language and communication, and at the moment the only way to make this possible, is to annotate such elements by hand. In the future, we might be able to do this automatically using AI, but in order to properly train AI, we first need manually annotated data sets.
Secondly, in a way, the ‘problems’ that annotators encounter probably reflect rather well how humans (subconsciously) perceive visual language and communication. There’s a reasonable chance that non-manual configurations or movements which annotators find difficult to annotate do not have a very clear meaning to people in a conversation – or possibly aren’t even noticed to begin with.
How we arrived at the proposed level-2 tier set
There are 21 level-2 tiers, which all describe different non-manual elements. Which elements those are, and which annotation labels are included for every tier, was determined based on five principles:
- One body part per tier – Every level-2 tier describes the characteristics of one specific body part, e.g., the eyelids, the nose, or the head.
- Poses or movements – Every level-2 tier has a set of labels exclusively for poses or exclusively for movements.
- Labels are exclusive – The labels within one tier may not be able to co-occur (e.g., ‘head forward’ and ‘head rotated down’ have to be annotated on separated tiers, because it is possible for someone’s head to simultaneously be in a forward and downward position).
- Labels are exhaustive – The labels within one tier have to cover the exhaustive set of possibilities for the relevant non-manual feature. On the 'p.torso.forward-backward' tier, for instance, this includes ‘torso forward, ‘torso backward’ and ‘neutral’.
- Labels are contrastive – The labels within one tier have to be sufficiently contrastive. On the 'p.torso.forward-backward' tier, for instance, one could in theory make a distinction between ‘torso slightly forward’ and ‘torso substantially forward’, but this difference is not contrastive enough, which increases the chance that annotators will disagree often, thus making annotations less reliable.